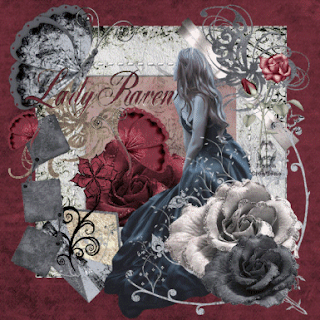
TUT ~ PTU DA SHABBYGRUNGE Scrapkit HERE
TUT BY LADY RAVEN CREATIONS
ÓSarah M A Feldsien
This tutorial was written by myself
Any similarities to other tutorials are purely coincidence
Please give credit to the tutorial writer and the scrapkit creator
when using this tutorial
Things you will need to do this tutorial:
ShabbyGrunge Scrapkit By DistinctivelyAuri (Link Above)
Tube of Choice
PSP 10
Animation Shop
Alien Skin Textures
Open Tube of Choice
Duplicate and Close
Open 550 X 550 Raster Image
Open DA_SGFrame1, Copy, Paste as New Layer into your new image then close the frame
Resize your tube you are using
Copy, Paste as New Layer on your image.
Close the tube now
Open DA_SGElement1, Resize, Copy, Paste as New Layer on your new image, Close the Element.
Open DA_SGRose3, Resize, Copy, Paste as New Selection, Mine is on the Element in the bottom right hand corner. Close the Rose.
Open DA_SGRose2, Resize, Copy, Paste as New Selection, Mine is on the other rose in the bottom right hand corner. Close the Rose.
Open New Raster Layer, Move to Layer just below your Frame
Open DA_SGRose1, Resize, Copy, Paste as New Selection, Position as desired, Mine is in the left hand inner corner of the frame. Close the rose.
Select the layer with your frame on it.
Open DA_SGButterfly6, Resize, Copy, Paste as New Selection, Mine is on the left hand side of the frame. Close the Butterfly.
Open DA_SGBowWrap1, Resize, Copy, Paste as New Selection, Mine is on the upper right hand side of the frame. Close the Ribbon.
Open DA_SGButterfly5, Resize, Copy, Paste as New Selection, Mine is on the upper right hand side of the frame on the ribbon. Close the butterfly.
Open DA_SGButterfly3, Resize, Copy, Paste as New Selection, Mine is on the upper Left hand corner of the frame. Close the butterfly.
Open DA_SGEnvelope2, Resize, Copy, Paste as New Selection, Mine is on the lower left hand corner. Close Envelope.
Open DA_SGFlower2, Resize, Copy, Paste as New Selection, Mine is on the lower left hand corner on the Envelope. Close Flower.
Open DA_SGPhotoMat1, Resize, Copy, Paste as New Selection, Mine is on the lower left hand corner on the Frame. Close PhotoMat.
Open DA_SGButterfly1 Resize, Copy, Paste as New Selection, Mine are on the left side no the PhotoMat and then Mirrored on the Flower. Close the Butterfly.
Open DA_SGRose4, Resize, Copy, Paste as New Selection, Mine is on the right hand side of the frame. Close the Rose.
Go to your bottom layer.
Select only the inside of the frame.
Open DA_SGPaper6, Copy, then go to bottom layer and paste as Into Selection.
Duplicate Layer twice.
Select the first one.
Go the your effects and find the Alien Skin Textures, Default texture. Then reduce the opacity on the layer to 50.
Go to second layer and repeat but this time click Random Seed. Opacity 50
Go to third layer and repeat and click random seed again. Opacity 50
Add New Raster Layer and send to bottom. Flood Fill with whatever color you with. This will be the background to your tag.
Go to the top layer and place your watermark.
Send the 2nd and 3rd layers to the bottom.
Save as Jpeg
Send 1st layer to bottom and bring the 2nd one just in front of your background.
Save as Jpeg.
Send 2nd to the bottom and bring the 3rd one just in front of your background.
Save as Jpeg.
Open Animation Shop, open your animation wizard. Import all 3 pics into the animation shop. Save as .gif.
You’re done!
Please give credit to Auri and I for the tut and scraps!
Import all Into Letter Creator and place as desired
I hope you enjoyed this tutorial as much as I enjoyed creating it!
Brightest Blessings and Darkest Dreams
LadyRavenCreations
ÓSarah Feldsien
To get all my tutorials email saphirevixen@gmail.com and place YOUR TUTS in the subject!
Or go to http://ladyravencreationstutorials.blogspot.com/


0 comments:
Post a Comment